1. Overview
Creating professional-quality prints from your Canva designs is easy, when you know the right steps. This guide covers everything you need to prepare, export and order print-ready artwork that looks perfect every time. Avoid common mistakes like low resolution, incorrect bleed or colour shifts that can spoil your final product.
Whether you're a creator, Etsy seller or small business, following this checklist will save you time, money and frustration, and help you unlock premium print quality with WTTB.
What is WTTB?
We're a UK-based print company trusted by thousands of creators, Etsy shops and small businesses nationwide. Our mission is to make it simple for you to turn designs into stunning products, with expert support, fast delivery and white-label options.
What's inside?
- Step-by-step instructions on setting up your Canva files for print
- Expert tips on image resolution, colour accuracy and file formats
- How to export and name your files for flawless uploads
- Guidance on using WTTB's printing options and artwork check services
- Special advice tailored for marketplace sellers and independent makers
Download our type: asset-hyperlink id: 3CE7fRjcA0awV1dClP6EQH for a beginner-friendly Canva guide that you can keep offline for quick reference, print setup tips and getting started with confident design.
2. Setting up your Canva file for print
Preparing your Canva design for professional printing? Get it right from the start. From choosing the correct finished size and applying bleed to using high-resolution imagery, fonts, and crop marks, setting up your file correctly ensures sharp, print-ready results every time.
This section covers the essential setup steps to help you avoid common print issues and create designs that look just as good in hand as they do on screen.
Finished size
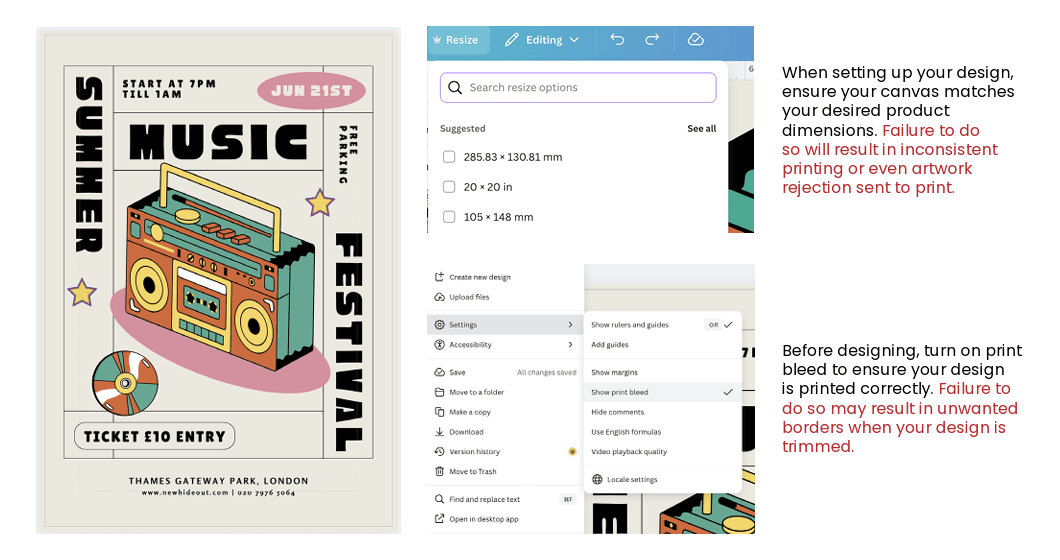
Your design's finished size is the final trim dimensions; it's what you'll hold in your hands after printing. In Canva, you should set your canvas to match your chosen product's size from the start.
For instance, if you're creating an A5 flyer, set your dimensions to 148 x 210mm. This ensures nothing is resized or cropped unexpectedly during production.
Looking for something bespoke? WTTB also offers custom sizes on select products. Get in touch with our Bespoke team to discuss the possibilities.
Safe area (5mm)
The safe area is your design's buffer zone. It's a 5mm space inside the trim edge where all vital content, like headlines, logos and key imagery, should sit. Why? During trimming, even the most precise machinery can shift by a fraction.
Keeping content within this zone ensures your message stays sharp, centred and uncut.
Bleed (3mm)
Bleed ensures your design goes right to the edge of the page, without unsightly white borders. In Canva, this means extending any backgrounds, colours or images 3mm beyond the finished size on all sides.
This overflow is trimmed away, but it guarantees a clean, professional result. To enable bleed in Canva, head to File > Settings and tick Show Print Bleed. Then, simply drag your elements past the guides.
Colour
While Canva works in RGB (perfect for screens), professional printing requires CMYK, which is a different colour profile entirely. WTTB automatically converts your files for print, but certain hues (especially neon and bright colours) can shift slightly in the process.
For more accurate results, stick to print-friendly colour palettes and preview how your design might appear once converted. Staying within the CMYK-safe range keeps things looking polished and consistent.
Fonts
Typography can make or break a design. For best results, use Canva's built-in fonts or upload high-quality custom typefaces. Avoid low-res or rasterised text, as it can appear fuzzy or unclear in print.
Keep your font sizes readable and consistent across the design, especially for small-format items like business cards or stickers. Clear fonts help your message stand out and print beautifully.
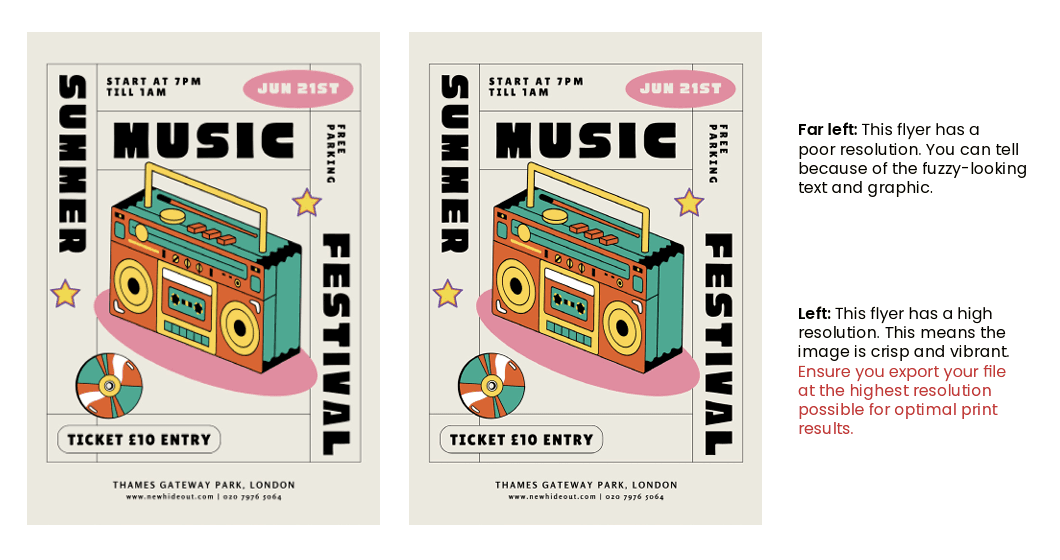
Image resolution
When it comes to images, clarity is key. All photos and graphics in your Canva file should be at 300 DPI or higher to ensure crisp, detailed print results. Web images, while fine for on-screen use, are often low resolution and can appear blurry or pixelated once printed.
If you're unsure, zoom in on your design in Canva. If it looks grainy, it probably needs replacing.
Crop marks and bleed
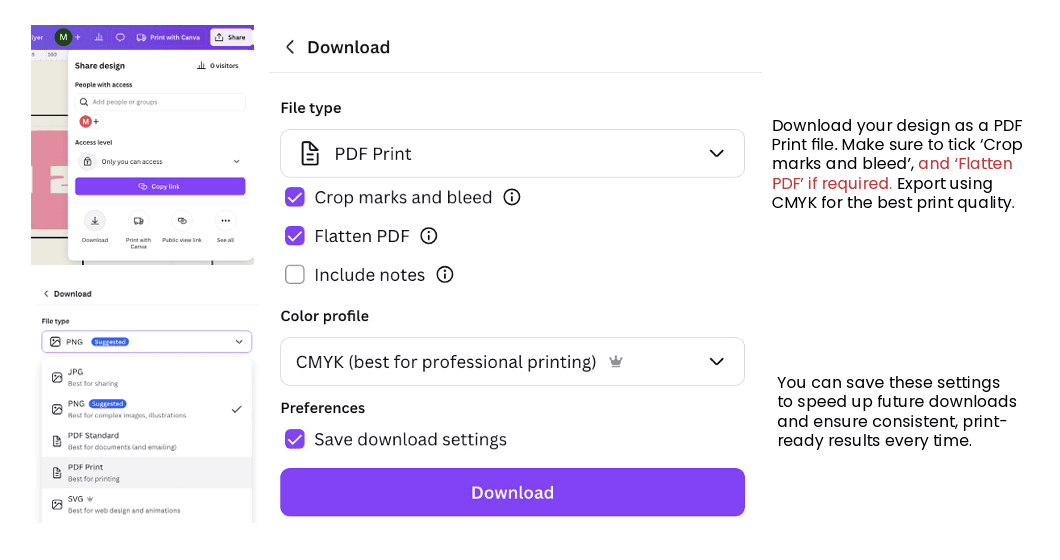
When downloading your design from Canva, always choose PDF Print as the format and tick the box for 'Crop marks and bleed'. Crop marks tell the printer exactly where to trim, while the bleed area ensures edge-to-edge printing without any gaps. It's a small step that ensures your design translates perfectly from screen to page.
File format
To get professional-quality from Canva, export your final design as a PDF Print file. This format locks in your layout, image resolution and font clarity, so that everything prints just as you've designed it. It's the industry standard for a reason: it delivers clean, consistent results across all print products.
3. Getting image quality right in Canva
What is DPI?
DPI stands for Dots Per Inch, and it's a key indicator of how sharp and detailed your images will be once printed. The higher the DPI, the crisper the final result.
For professional print, 300 DPI is the gold standard for delivering sharp lines, smooth gradients and clean visuals. By contrast, 72 DPI is optimised for screens and often appears pixelated or blurry when printed.
What you need to know about Canva and DPI
Unlike traditional design tools, Canva doesn't show DPI values within the platform. It optimises images for screen use, which can be misleading. A photo that looks perfectly sharp on your monitor might print soft or grainy.
To check image quality in Canva, zoom in to at least 200%. If the image appears blurry or lacks detail at that zoom level, it will likely print that way too. Start with the highest-resolution images possible, especially if your design features large visuals or full-bleed backgrounds.
For best results, use images that are at least 2500 pixels wide for A5 designs or larger formats.
Common image issues to avoid
Small JPGs or PNGs often look fine on screen but degrade significantly in print. Always use the highest-resolution versions available. Avoid images pulled from Google or social media, and never rely on screenshots.
Overstretching images beyond their original size will cause pixelation. If you need a full-page background, don't stretch a small image. Instead, use a properly sized asset or a high-resolution alternative. In Canva, you can right click and select Set Image as Background to anchor your image correctly.
Full bleed backgrounds and design elements
Designs with large, full-bleed backgrounds demand high-resolution imagery. If you're using Canva's built-in image library, opt for Canva Pro assets where possible, as these tend to offer higher quality files better suited for print.
Avoid placing key text inside images. Instead, use Canva's text tool for sharper results. Live text will always render cleaner than flattened image text in a print file.
Using vectors
Where you can, use vector files like SVGs or Canva's built-in icons. Unlike raster images, vectors can be scaled to any size without losing quality; ideal for logos, icons and illustrations that need to remain razor-sharp at any size.
Flattening PDFs
If your design is image-heavy or contains many layered elements, you may consider enabling Flatten PDF when exporting. This reduces file size and flattens the artwork into one printable layer. However, for text-based designs or anything requiring pin-sharp type, it is best to leave this unticked to preserve clarity.
4. Colour and printing accuracy
One of the most common surprises in printing is that the colours on your screen don't always match the colours on your printed products. That is because digital design and print production speak two different colour languages: RGB and CMYK.
Understanding the difference between RGB and CMYK
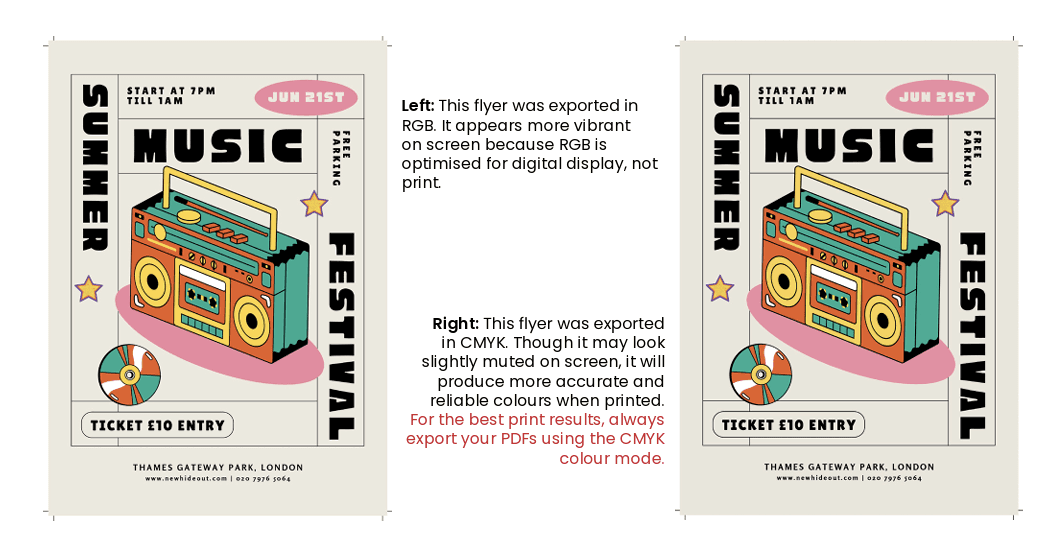
RGB (Red, Green, Blue) is a light-based colour system used for screens. It is vibrant, high-contrast and ideal for digital media like websites, presentations and social content.
CMYK (Cyan, Magenta, Yellow, Black) is a pigment-based system used by printers. It mixes physical inks on paper, which naturally appear more muted than their on-screen equivalents.
Canva designs are created in RGB, but all WTTB print files are converted to CMYK during production. This means that colours, particularly bright blues, neons, greens and intense gradients, may appear differently when printed. This isn't an error, it is a shift in how colour is translated from screen to paper.
Why do colours look different in print?
Screens display colours using light, making them appear sharper and more vibrant. Printers, on the other hand, use ink, which absorbs light rather than emits it. This shift results in a few typical changes:
- Neon colours will appear softer or more subdued
- Dark greys can print closer to black
- Subtle gradients or pale tones may blend or flatten slightly
To manage expectations, we always recommend avoiding reliance on overly bright digital colours, especially if exact colour fidelity is crucial. Want to see how your colours behave in real life? Request a free sample pack or order a short run first.
How to improve colour accuracy
Use high-contrast palettes: These translate better from screen to paper, especially when layering elements or using text on coloured backgrounds. Strong contrast improves clarity in both formats.
Don't trust screen previews alone: Canva doesn't offer CMYK previews, so what looks bold online may not hold up in print. Export your design and view it on multiple devices, or better still, run a physical test print.
Choose the right paper stock: The paper print on affects how colour appears. Gloss and silk-coated papers enhance vibrancy and contrast, making them perfect for bold visuals. Uncoated papers will mute tones for a more organic, tactile finish, which is great for minimal or soft designs.
Common colour pitfalls to watch for
During artwork checks, we regularly see a few recurring issues that affect print quality:
- Colour banding, where gradients print with visible lines or streaks
- Grey tones shifting to green or warm hues, especially on low-grade or absorbent stocks
- Bright tones appearing unexpectedly dull when printed without compensation
Being aware of these risk allows you to design smarter and print with confidence.
Using black correctly in print
Avoid using pure black (100% K) for large areas or dark backgrounds, as it can look washed out or uneven. Instead, use Composite Black (C82, M80, Y80, K100), a rich black that appears deep and consistent when printed.
For small text or fine lines, 100% K is still the way to go. This ensures sharp, readable typography without the risk of ink bleed or misregistering.
5. Exporting your designs for print
Once your design is polished and ready to go, exporting it properly is the final (and most important) step to getting a flawless print result. Canva makes the process simple, but there are a few crucial settings you need to get right to ensure your file prints exactly as intended.
How to export your Canva file for print
Click Share in the top-right corner of the Canva editor, then select Download. This opens up your export options.
Under File Type, choose PDF Print. This is the highest-resolution export Canva offers, and the only one suitable for professional printing. Avoid formats like PNG or JPG, which are compressed and can reduce image quality significantly.
Next, make sure to tick the box for Crop marks and bleed. This ensures your file includes trim guides and the full bleed area, which is critical for achieving a clean edge-to-edge print. Without this, you risk white borders or uneven cutting.
Should you flatten your file?
If your design is heavy on images, textures or effects, Canva may automatically flatten the file during export to simplify layers. In general, we recommend leaving the flatten option off unless your file is taking too long to download or you are seeing export glitches. For crisp text and cleaner layering, a non-flattened PDF is typically best.
Final checks before uploading
Once exported, open your file using a PDF viewer like Adobe Acrobat and zoom in to 200-300%. If your images and text still appear sharp and clear, your file is print ready. This quick check helps catch any pixelation, compression or font issues before you hit Order.
Canva file checklist
Here's a quick summary of what your exported file should include for the best results:
- File format: PDF Print
- Colour mode: CMYK (converted automatically by WTTB)
- Bleed: 3mm on all sides
- Crop marks: Enabled
- Fonts: Canva's native fonts are embedded automatically
- Image resolution: 300 DPI or higher throughout
Common export mistakes to avoid
- No bleed or crop marks included: This often results in white edges or misaligned cuts
- Wrong file type selected: JPG or PNG files may look fine on screen but are compressed and not suitable for print
- Low-resolution uploads or screenshots: Canva allows these, but they will likely appear blurry or pixelated in your final print.
Need a final check?
Want peace of mind before you send your design to print? Select our Artwork Check service at checkout. Our print experts will review your file and make sure everything is in order, from bleed to resolution, so you can print with confidence.
6. Uploading, ordering and final checks
Once your design is ready to go, the final steps, like uploading, ordering and confirming your file, are just as important as the creative work. Follow this simple workflow to ensure your print job runs smoothly from checkout to delivery.
Step 1: Choose your product
Start by selecting your product on the WTTB site, including the size, orientation, paper stock and finish. Getting these details right upfront ensures your artwork aligns perfectly with the final product and avoids any surprises at the proofing stage.
Step 2: Secure your order
After selecting your print options, complete your payment to confirm your order. This locks in your chosen specs, allocates production resources and prepares our system to receive your artwork.
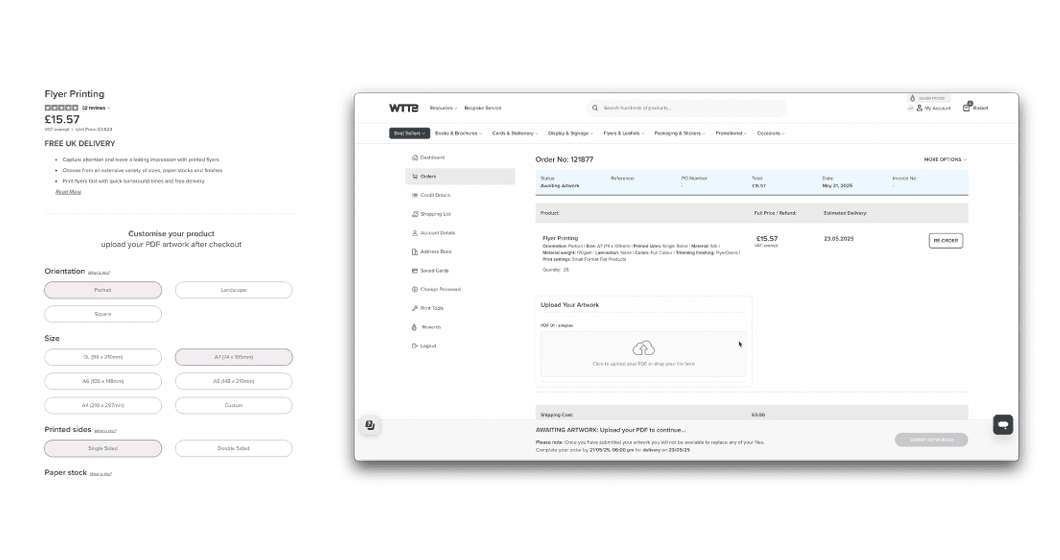
Step 3: Upload your artwork
Once your payment has been processed, you'll be prompted to upload your print-ready PDF file, whether created in Canva or another design platform. Make sure your file has been exported using PDF Print format with crop marks and bleed included.
Need help setting up your file? Our downloadable templates (available in PDF and InDesign formats) are designed to fit our products perfectly, helping you avoid errors and save time.
Final file preparation tips
Before uploading your artwork, take a moment to double-check the following:
- Your design matches the size, orientation and format of the product you've selected
- You've included 3mm bleed and crop marks
- All images are at least 300 DPI for high-quality results
- Fonts are embedded and legible
- Colour mode is set to CMYK for accurate colour reproduction
- You've used PDF Print, not PNG or JPG, to preserve quality
Using our pre-made templates is a great way to speed up approval and avoid production delays.
What happens after you upload?
Once your artwork is uploaded:
- Our system runs an automated integrity check to ensure the file is usable
- If you opted for our Artwork Check service, a print expert will manually review your file for technical issues
- If anything's amiss, our team will be in touch promptly to help you fix it
- Once everything is approved, your order moves straight into production
Need help along the way?
Whether you're unsure which paper stock to choose or need assistance uploading your Canva designs, our UK-based print experts are ready to support you.
7. Bonus tips for Etsy sellers & small business owners
Selling your products online? Whether you're an Etsy seller, boutique brand or side-hustle superstar, nailing your print setup is essential. These bonus tips are tailored to help small businesses get professional results, avoid costly mistakes and make the most of their print partner.
Start with the right canvas
Begin by setting your Canva file to match the exact size of the product you're printing. This prevents any distortion, misalignment or resizing headaches during production, which are especially important for packaging, cards and promotional inserts. Measure twice, design once.
Use bleed and safe zones every time
Add 3mm bleed around all edges of your design and keep critical content, like logos, contact details or decorative borders, at least 5mm inside the edge. These margins protect your work during trimming and help your prints look polished and professional.
Check colours early
Canva designs in RGB, but your prints are produced in CMYK. For brand consistency, especially if you're using specific colours for your packaging or marketing, export and preview your file in CMYK. This helps avoid surprises and keeps your visual identity on point.
Order a sample pack first
Before committing to a larger print run, request a free sample pack from WTTB. You'll get to see and feel different paper stocks, weights and finishes. It is a small step that can make a huge difference in how your product is perceived.
Keep your files print-ready
For smooth production and professional results, your files should always be:
- Exported as PDF Print
- Set with crop marks and bleed
- Designed using high-resolution images (300 DPI+)
- With fonts either embedded or outlined
These steps ensure your print job flows seamlessly without delay or quality loss.
Plan your print stock in advance
Avoid last-minute scrambles by printing in realistic batches based on quarterly sales. With WTTB, you're not locked into high minimum orders. Our flexible quantities and sitewide discounts help you order smart, reduce waste and scale as you grow.
Why WTTB works for small businesses
We know what it's like to wear many hats. Here's how we make print simple and scalable for creators and small brands:
- Canva-friendly templates and guides meaning you can get it right first time with no guesswork required
- Our expert understands the challenges of small-scale selling and is here to help with file checks and practical advice
- Ship directly to customers with white-label packaging