||


Size
Orientation
Printed Sides
Lamination
Spot UV
Corner finish
Optional extras
Versions
Quantity Per Version
Essential
23-point automated check
Free
Advanced
41-point inspection by a prepress technician
FREE if using your Print Perk Points at checkout
Order summary:
Spot UV Business Cards
Quantity: x100 | Paper Size: 85 x 55mm | Orientation: Landscape | Printed Sides: Single Sided | Lamination: None | Colours: Full Colour | Material Weight: 400gsm | Material: Silk | Special Finishing: Spot UV (One Side) | Finishing Types: Square Corners | Print Settings: Small Format Flat Products |
Artwork Technical Check: Essential - FREE
See what our customers say about Spot UV Business Cards
Matt laminationFor a sophisticated, softer look and feel as well as offering protection to your print.
Soft touch laminationAdd a luxurious layer of protection to your print with a soft, velvet-like texture.
Scodix© spot UVA stunning high gloss clear finish to enhance specific areas of your design.
Round cornersAdd a smooth round alternative to the standard square corner of your print.
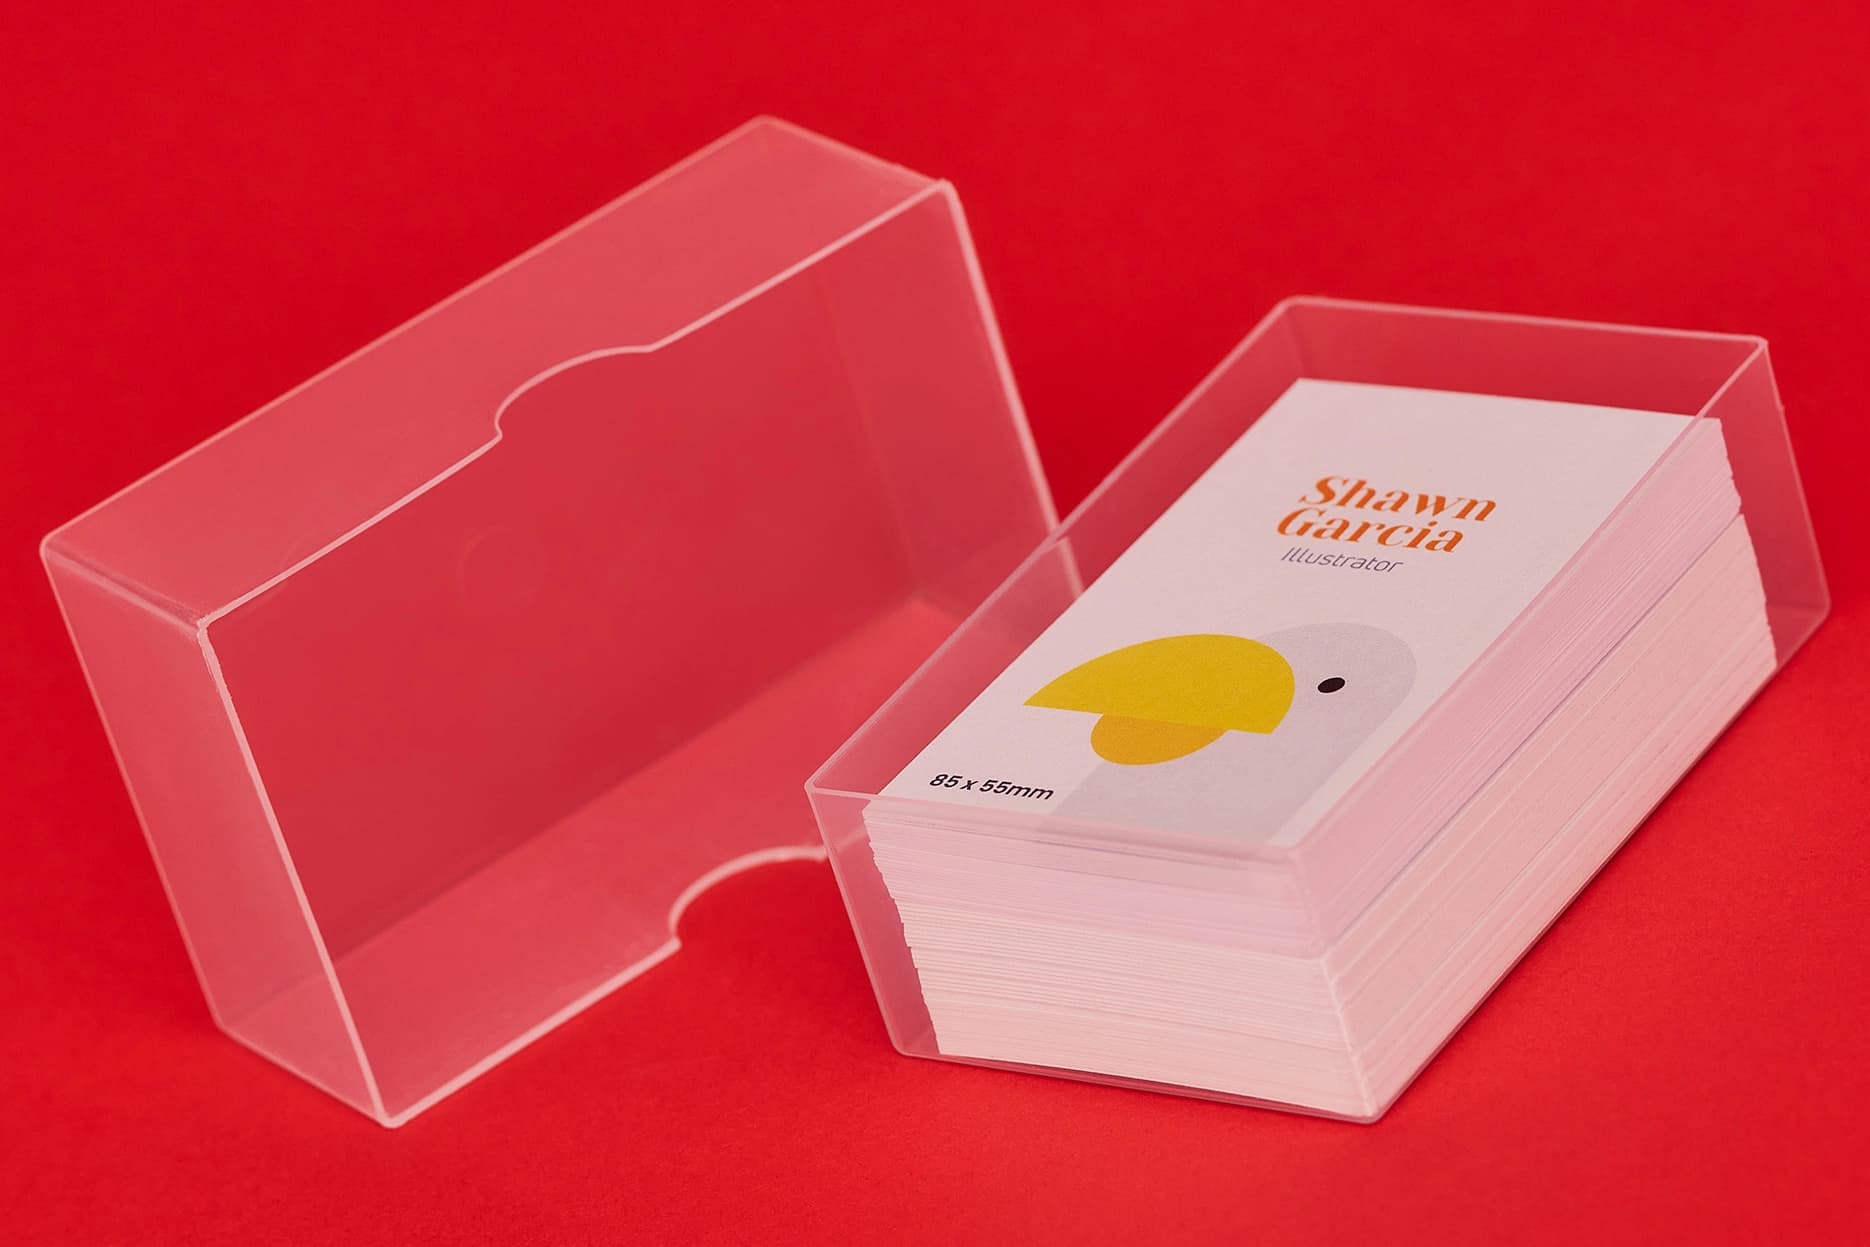
Recycled plastic business card boxAdd our handy, durable storage box to your order. Made from recyclable rigid clear plastic.
Matt laminationFor a sophisticated, softer look and feel as well as offering protection to your print.
Soft touch laminationAdd a luxurious layer of protection to your print with a soft, velvet-like texture.
Scodix© spot UVA stunning high gloss clear finish to enhance specific areas of your design.
Round cornersAdd a smooth round alternative to the standard square corner of your print.
Recycled plastic business card boxAdd our handy, durable storage box to your order. Made from recyclable rigid clear plastic.
Product description
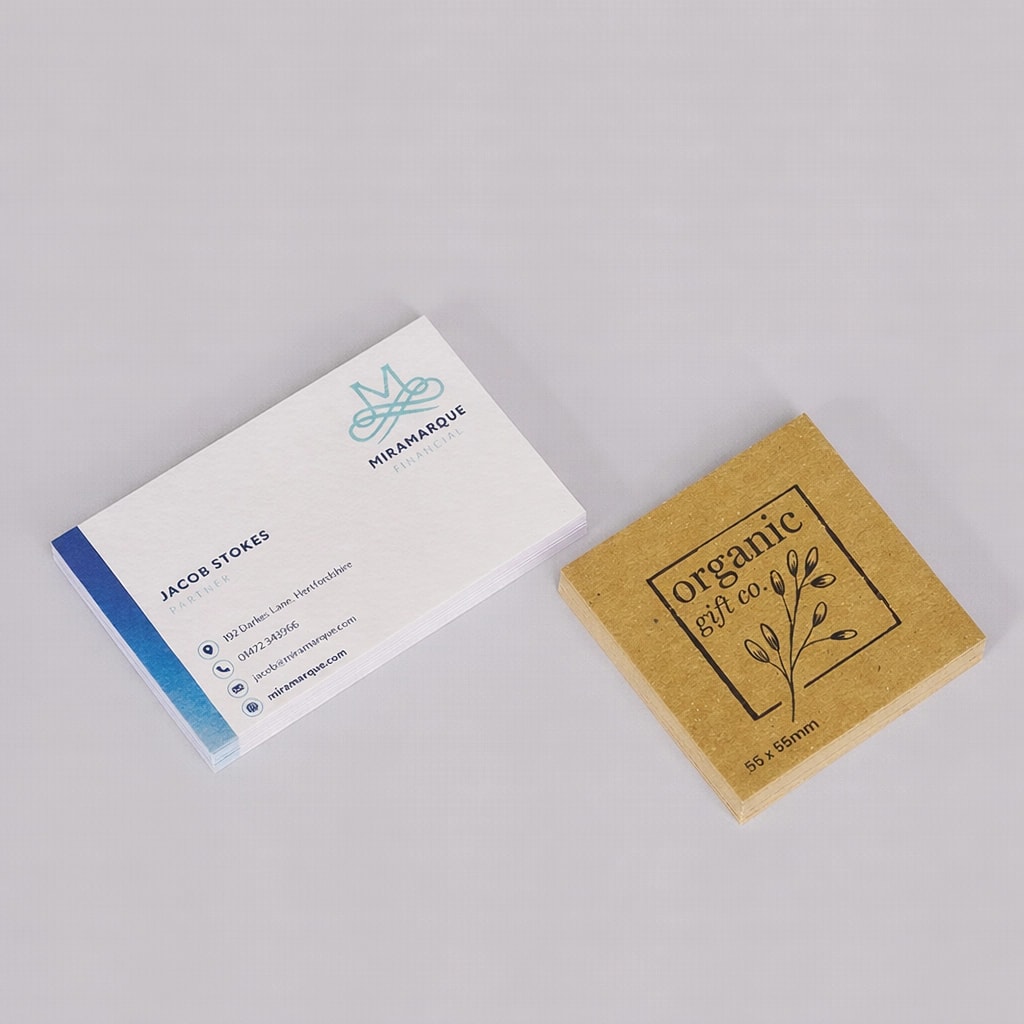
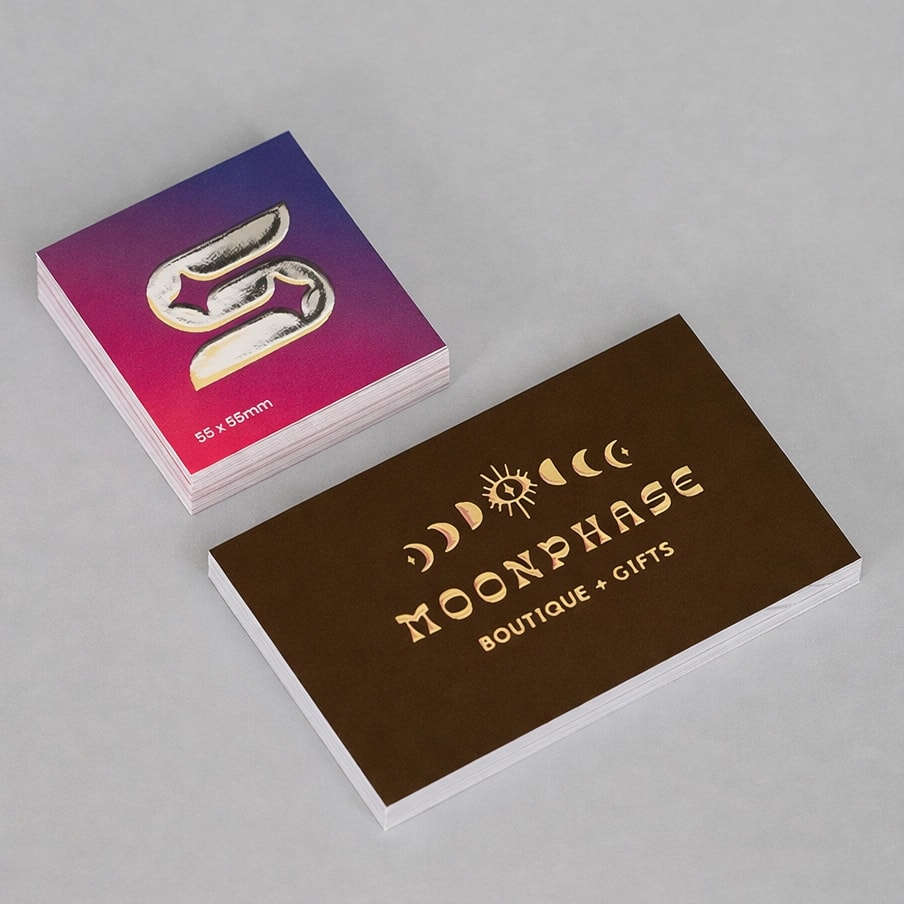
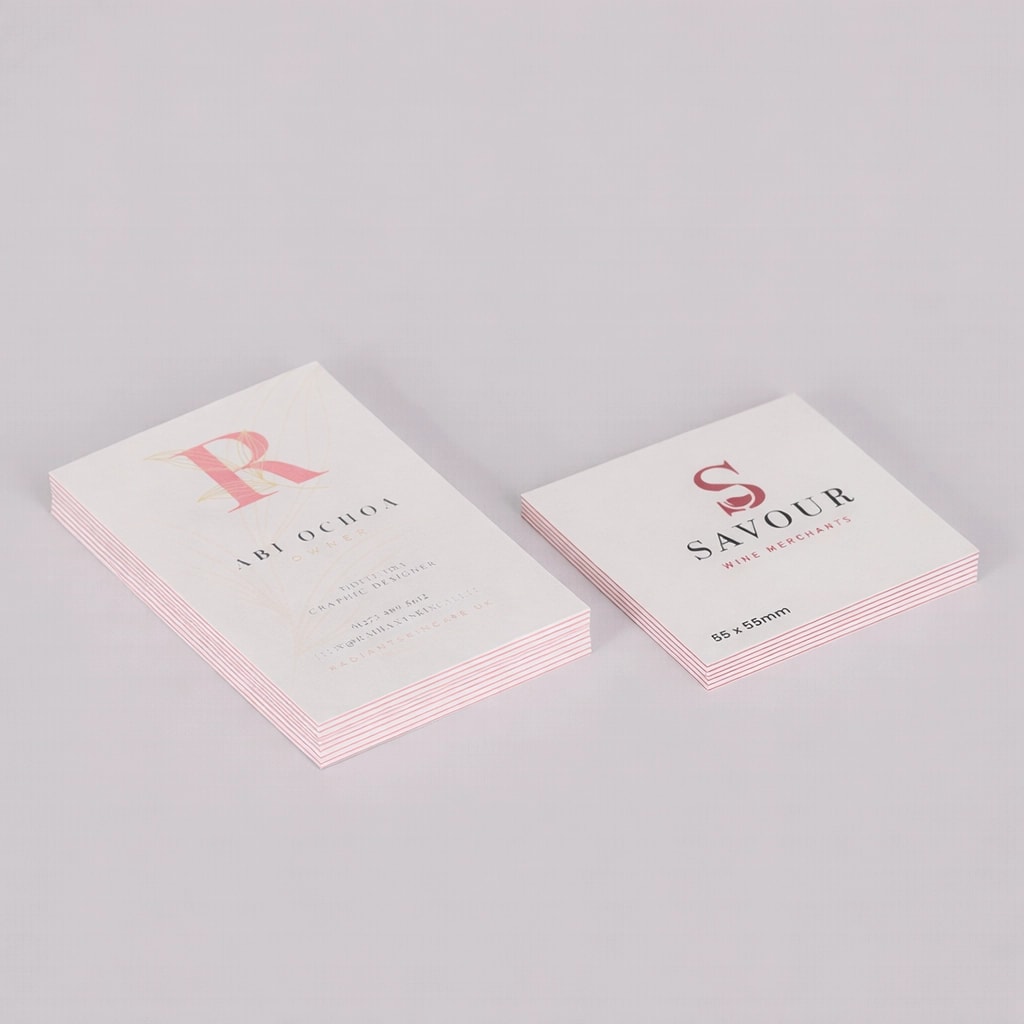
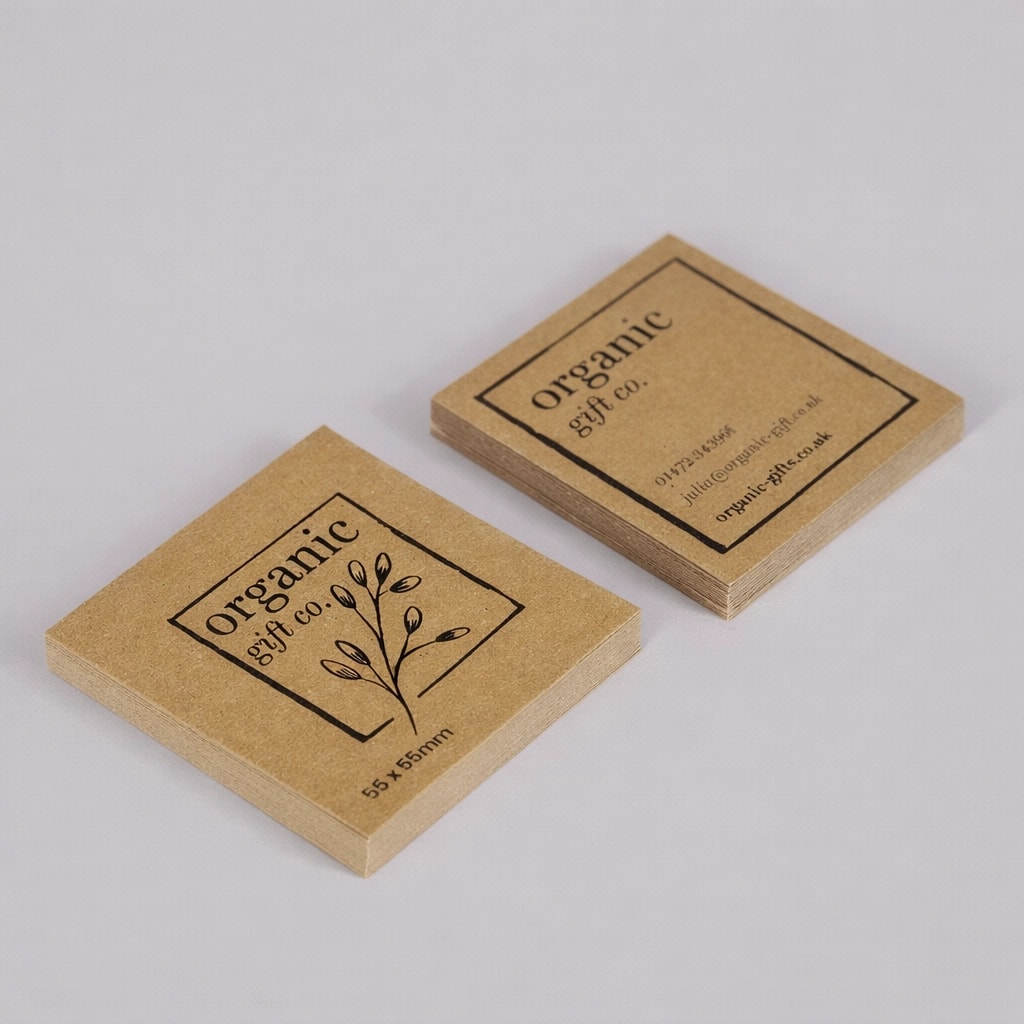
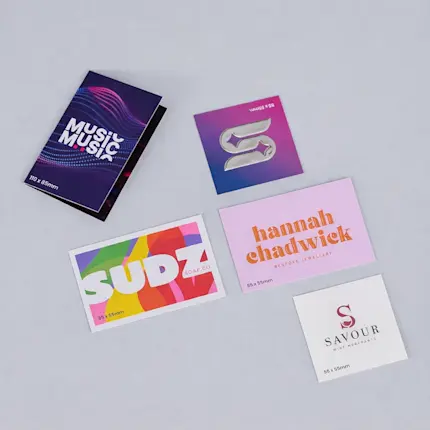
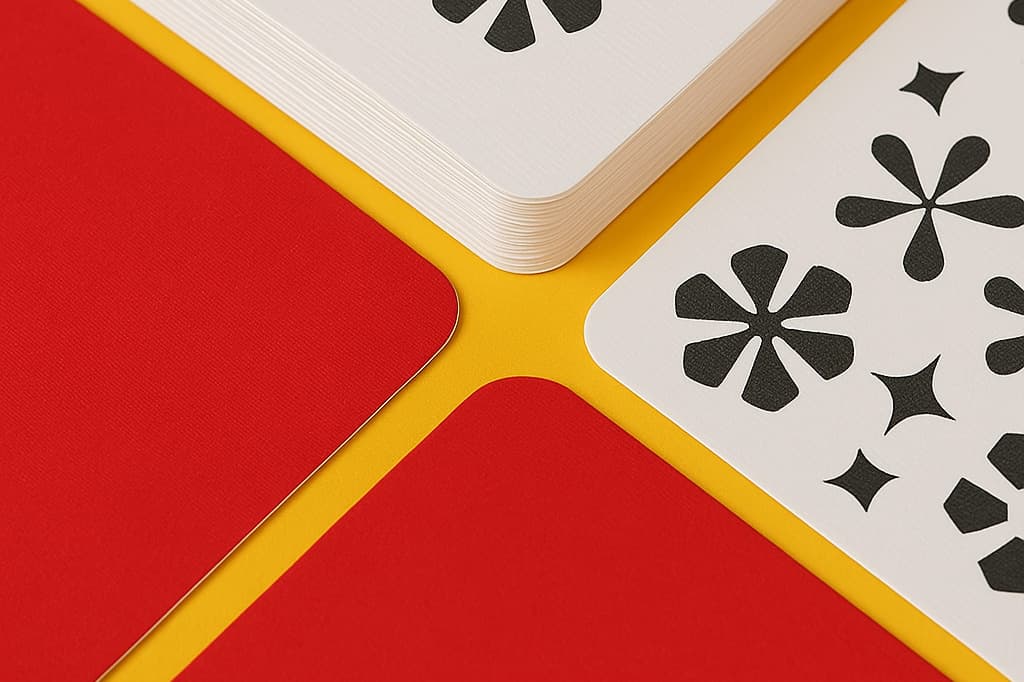
Embrace the limelight with our Spot UV Business Cards, offering a captivating, high-end finish sure to command attention. Elevate your brand's presence with striking spot UV highlights, infusing your design with a touch of sophistication.
Tailor your spot UV cards perfectly with our customisable printing options, ensuring they align seamlessly with your vision. Whether opting for single or double sided and portrait or landscape orientations, your scodix business cards are bound to stand out.
Crafted with premium silk stocks, our spot gloss business cards marry durability with elegance. Enrich your design with a choice of finishes, including matt, gloss or soft touch lamination, each adding a layer to every card. Complete the look with round cornering, ensuring your UV business cards exude a polished and professional aesthetic.
Networking, client presentations, creative portfolios and more.
Top tip
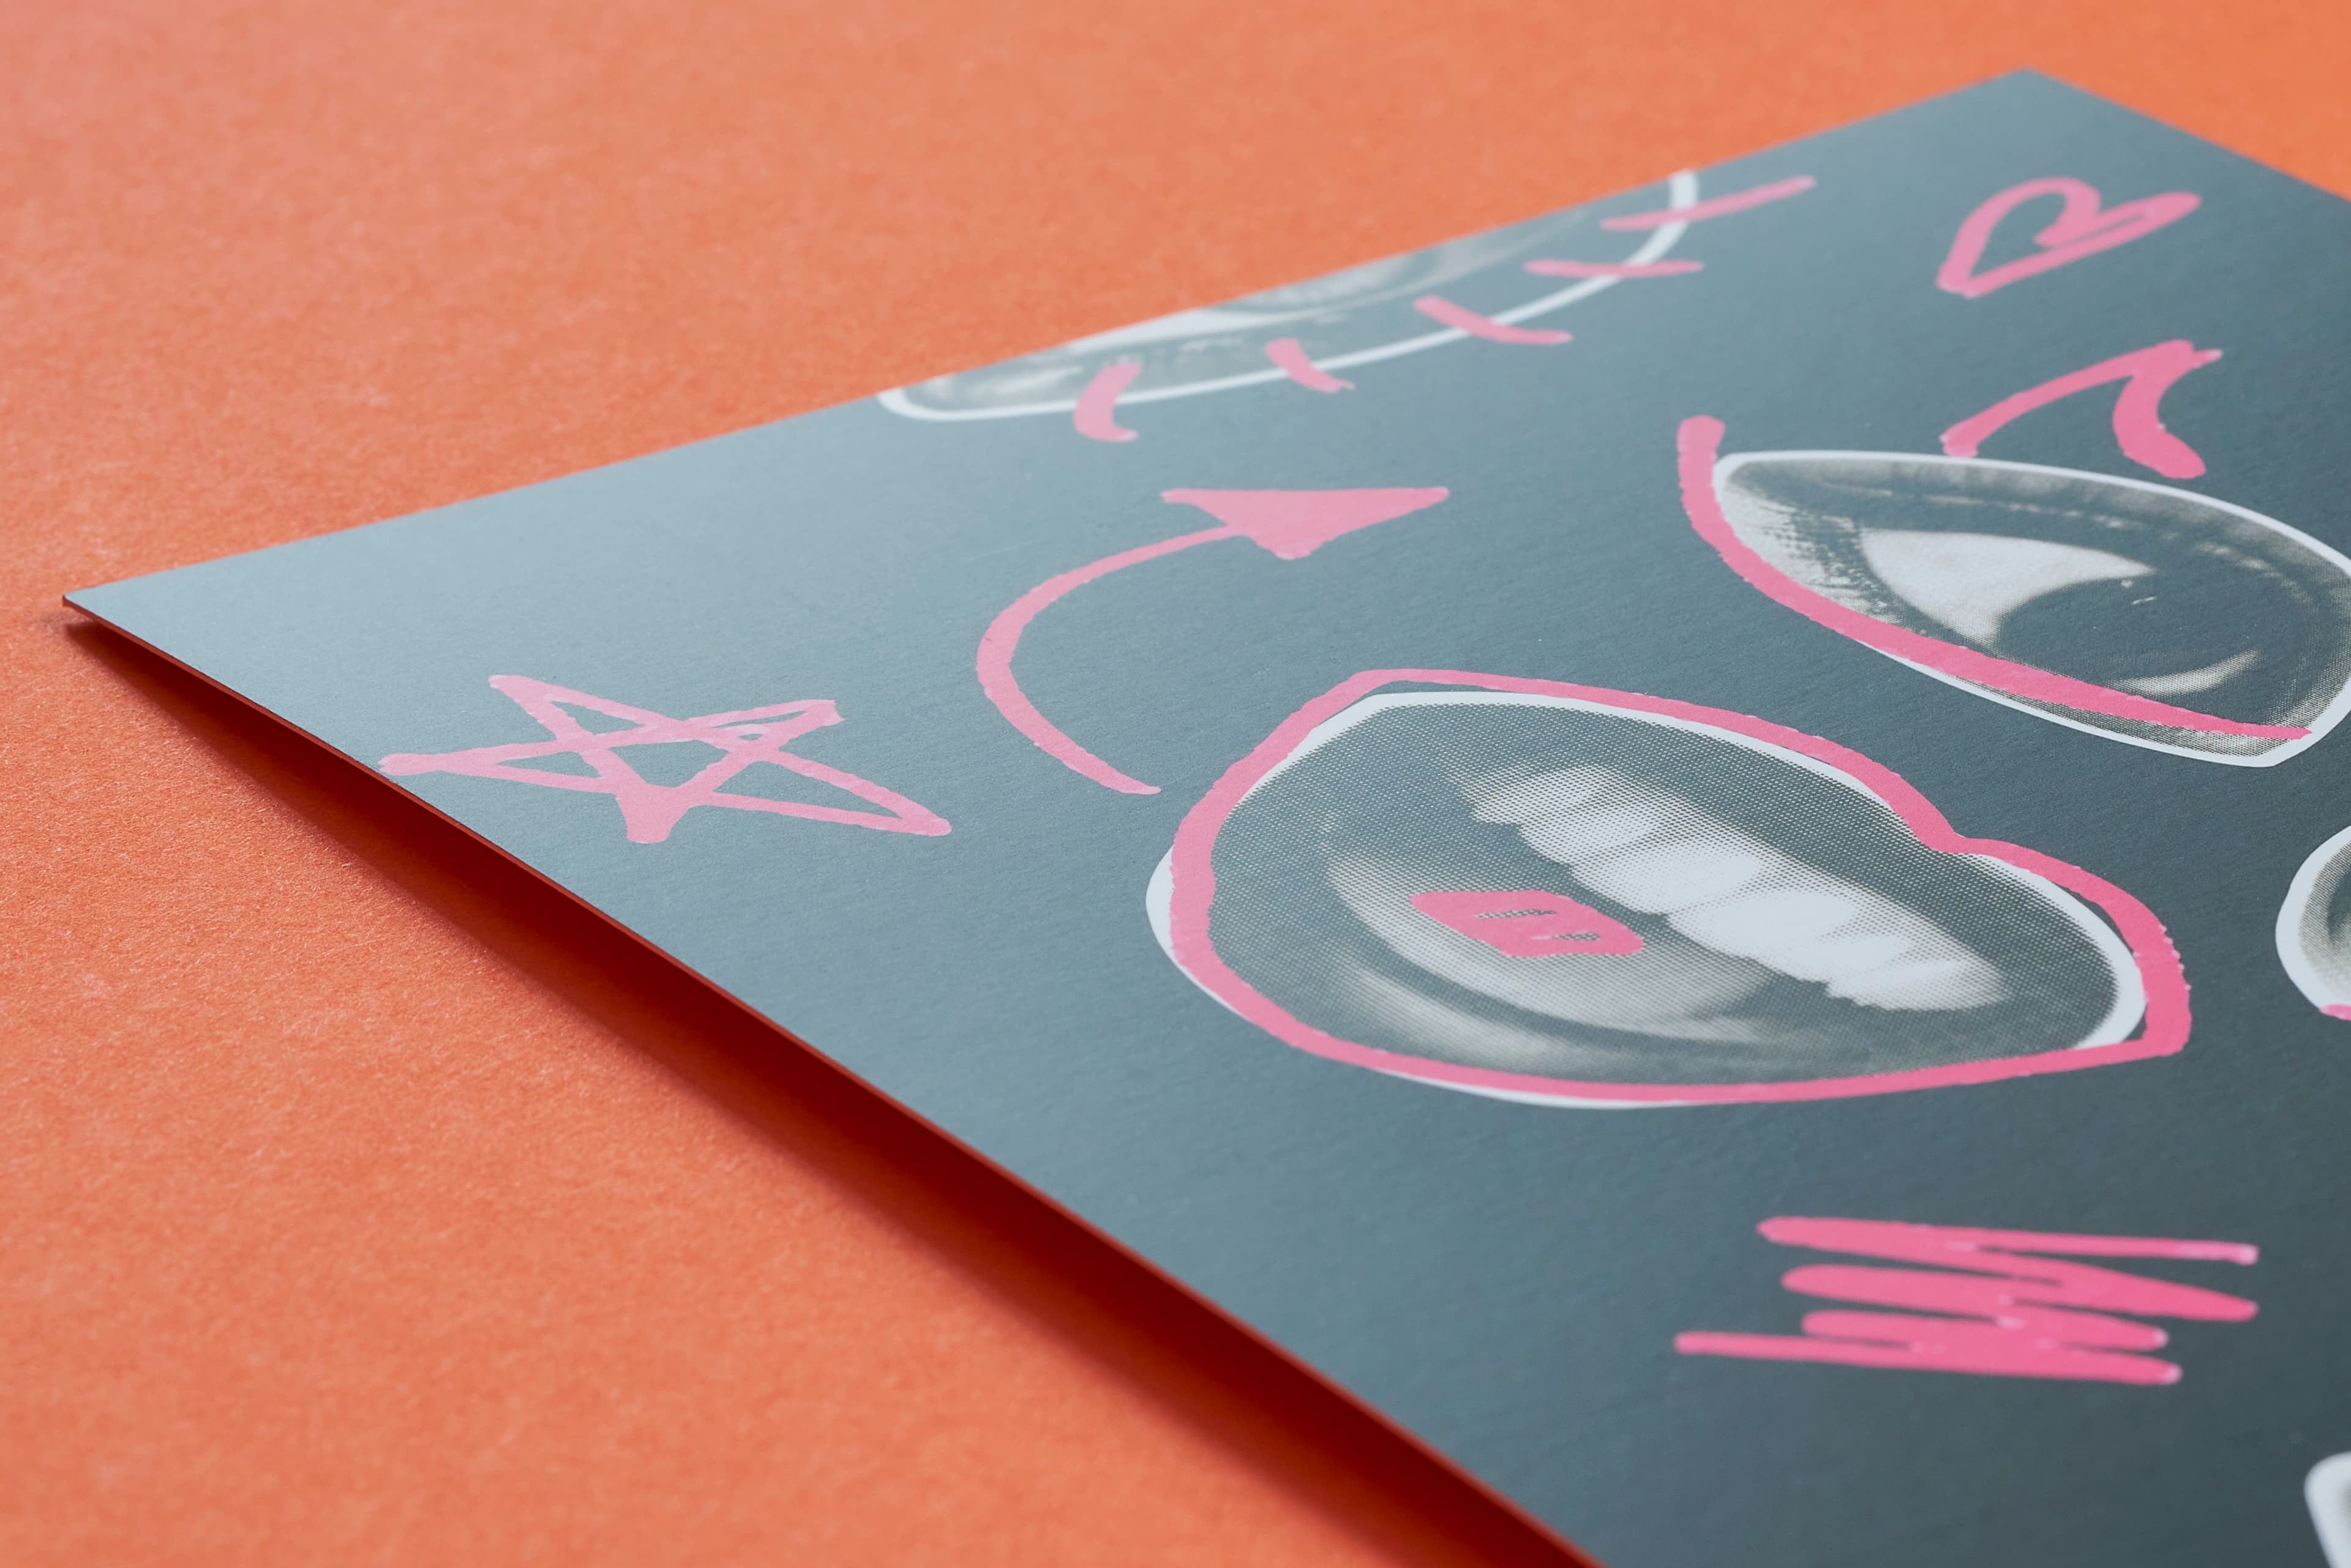
Customise the impact of your Spot UV business card by varying the height and opacity of your Scodix elements. Use the 10%, 20%, and 100% opacity settings to create depth and definition, highlighting key design features for a striking and professional finish.
Looking for other premium networking solutions? Explore our wide range of business cards.
Design guidelines
To make artwork setup simple, we recommend downloading the relevant template from the 'Product Templates' section above. Don’t forget to follow the template instructions and delete the 'guide' layer before exporting your design to a PDF.
For best printing results, ensure your artwork and images are CMYK. If you use RGB, Pantone or spot colours in any element of your artwork, we will automatically convert them to CMYK which may change your colour profile.
To eliminate any font issues, make sure all fonts are ‘embedded’ or ‘converted to outlines’ before creating your PDF print file. To ensure legibility, we recommend using a minimum font size of 10pt.
For optimal image print quality, ensure all images are 300dpi to 450dpi. Anything lower than 300dpi will give poor image quality. Images higher than 450dpi will result in high file sizes and may cause longer upload times.
To avoid alignment issues during cutting, be sure to include ‘crop marks’ (offset 10mm) and ‘document bleed’ when exporting your artwork file to PDF. Refer to our product templates for the required bleed specifications.
To meet our print requirements, ensure your file is exported in Adobe PDF (Print) format, ideally as PDF/X-1a: 2001.
Need further guidance? Our help centre is here to provide the answers.
How to print with Canva
We provide free Canva templates for many of our products to make artwork setup quick and print ready. If this product displays a Canva icon above, click it to open the correct template in Canva. Each template includes the correct dimensions, bleed and safe zones to help you set up your artwork correctly from the start.
Once your design is complete, download your artwork and return here to place your order.
If this product does not currently include a Canva template, you can still browse our full collection of Canva-compatible templates to find suitable alternatives.
When opening a template, it will launch in a new tab with all guides preloaded for you. Remember to remove any template guide layers before exporting your final artwork.
Need help getting started with WTTB Canva templates? Read the WTTB Canva template guide or watch our YouTube tutorial on how to use WTTB Canva templates.
For the most accurate print results, always set your design to CMYK colour mode where possible. Canva designs are usually created in RGB, which may cause slight colour shifts when converted for print.
We recommend checking colours carefully before exporting to help avoid unexpected results in your final print.
Need help setting up colours correctly? Read the print colour guide or watch our YouTube tutorial on how to get accurate print colours in Canva.
Use Canva fonts at a minimum size of 10pt to help maintain legibility when printed. Keep all important text within the safe area to prevent anything being trimmed during production.
For images, always use high resolution files at 300 DPI or higher. Low resolution images can appear blurry or pixelated once printed.
Need help preparing artwork for high quality print? Read our artwork resolution guide or watch our YouTube tutorial on how to export Canva designs for high quality print.
Extend any backgrounds, colours or images fully into the bleed area to avoid unwanted white edges after trimming. Keep important text, logos and key design elements safely inside the designated safe zone. Correct bleed setup is essential for achieving a professional print finish.
Need help setting up bleed correctly? Read our bleed setup guide or watch our YouTube tutorial on how to set up bleed in Canva for print ready designs.
When exporting from Canva, choose PDF Print as your file format and ensure 'Crop Marks and Bleed' is selected before downloading your artwork.
Once your artwork has been finalised, upload the completed PDF when placing your order with WTTB.
Need help exporting your artwork? Visit our Canva Hub for step by step guides on creating and exporting print ready designs in Canva, or watch our YouTube tutorial on how to export Canva designs for print with WTTB below.
Understanding Scodix Foil
Add premium detail and eye-catching finishes to your artwork with digital foil enhancements. Watch our How to Elevate Your Print with Scodix Digital Foil video guide to discover how foil effects can make your print stand out.
Product description
Embrace the limelight with our Spot UV Business Cards, offering a captivating, high-end finish sure to command attention. Elevate your brand's presence with striking spot UV highlights, infusing your design with a touch of sophistication.
Tailor your spot UV cards perfectly with our customisable printing options, ensuring they align seamlessly with your vision. Whether opting for single or double sided and portrait or landscape orientations, your scodix business cards are bound to stand out.
Crafted with premium silk stocks, our spot gloss business cards marry durability with elegance. Enrich your design with a choice of finishes, including matt, gloss or soft touch lamination, each adding a layer to every card. Complete the look with round cornering, ensuring your UV business cards exude a polished and professional aesthetic.
Networking, client presentations, creative portfolios and more.
Top tip
Customise the impact of your Spot UV business card by varying the height and opacity of your Scodix elements. Use the 10%, 20%, and 100% opacity settings to create depth and definition, highlighting key design features for a striking and professional finish.
Looking for other premium networking solutions? Explore our wide range of business cards.
Design guidelines
To make artwork setup simple, we recommend downloading the relevant template from the 'Product Templates' section above. Don’t forget to follow the template instructions and delete the 'guide' layer before exporting your design to a PDF.
For best printing results, ensure your artwork and images are CMYK. If you use RGB, Pantone or spot colours in any element of your artwork, we will automatically convert them to CMYK which may change your colour profile.
To eliminate any font issues, make sure all fonts are ‘embedded’ or ‘converted to outlines’ before creating your PDF print file. To ensure legibility, we recommend using a minimum font size of 10pt.
For optimal image print quality, ensure all images are 300dpi to 450dpi. Anything lower than 300dpi will give poor image quality. Images higher than 450dpi will result in high file sizes and may cause longer upload times.
To avoid alignment issues during cutting, be sure to include ‘crop marks’ (offset 10mm) and ‘document bleed’ when exporting your artwork file to PDF. Refer to our product templates for the required bleed specifications.
To meet our print requirements, ensure your file is exported in Adobe PDF (Print) format, ideally as PDF/X-1a: 2001.
Need further guidance? Our help centre is here to provide the answers.
How to print with Canva
We provide free Canva templates for many of our products to make artwork setup quick and print ready. If this product displays a Canva icon above, click it to open the correct template in Canva. Each template includes the correct dimensions, bleed and safe zones to help you set up your artwork correctly from the start.
Once your design is complete, download your artwork and return here to place your order.
If this product does not currently include a Canva template, you can still browse our full collection of Canva-compatible templates to find suitable alternatives.
When opening a template, it will launch in a new tab with all guides preloaded for you. Remember to remove any template guide layers before exporting your final artwork.
Need help getting started with WTTB Canva templates? Read the WTTB Canva template guide or watch our YouTube tutorial on how to use WTTB Canva templates.
For the most accurate print results, always set your design to CMYK colour mode where possible. Canva designs are usually created in RGB, which may cause slight colour shifts when converted for print.
We recommend checking colours carefully before exporting to help avoid unexpected results in your final print.
Need help setting up colours correctly? Read the print colour guide or watch our YouTube tutorial on how to get accurate print colours in Canva.
Use Canva fonts at a minimum size of 10pt to help maintain legibility when printed. Keep all important text within the safe area to prevent anything being trimmed during production.
For images, always use high resolution files at 300 DPI or higher. Low resolution images can appear blurry or pixelated once printed.
Need help preparing artwork for high quality print? Read our artwork resolution guide or watch our YouTube tutorial on how to export Canva designs for high quality print.
Extend any backgrounds, colours or images fully into the bleed area to avoid unwanted white edges after trimming. Keep important text, logos and key design elements safely inside the designated safe zone. Correct bleed setup is essential for achieving a professional print finish.
Need help setting up bleed correctly? Read our bleed setup guide or watch our YouTube tutorial on how to set up bleed in Canva for print ready designs.
When exporting from Canva, choose PDF Print as your file format and ensure 'Crop Marks and Bleed' is selected before downloading your artwork.
Once your artwork has been finalised, upload the completed PDF when placing your order with WTTB.
Need help exporting your artwork? Visit our Canva Hub for step by step guides on creating and exporting print ready designs in Canva, or watch our YouTube tutorial on how to export Canva designs for print with WTTB below.
Understanding Scodix Foil
Add premium detail and eye-catching finishes to your artwork with digital foil enhancements. Watch our How to Elevate Your Print with Scodix Digital Foil video guide to discover how foil effects can make your print stand out.
Spot UV business cards utilise the Scodix process to apply a glossy, raised coating to selected areas of the silk card, creating a striking contrast with the matte or textured background. This technique highlights specific design elements, adding a premium and eye-catching effect. Spot UV cards are popular for their ability to make a bold impression, offering both visual appeal and tactile interest.
Scodix is a digital enhancement technology that applies a high-gloss finish to printed materials. This process creates a striking, shiny effect on specific areas of the design, adding a premium and eye-catching touch to the final product.
To set up your spot UV file, start by creating a new spot colour swatch in your design software and name it "Scodix." Duplicate all pages of your design, then apply the "Scodix" spot colour to the elements where you want the spot UV varnish to appear. Ensure that any non-spot UV elements are removed from these pages. Include a 2mm margin around the edges of your design to prevent cracking during trimming.
Yes, unlike traditional spot UV, Scodix allows you to adjust the height and opacity of your spot UV elements. Apply 10%, 20%, and 100% opacity in your spot UV file to create varying depths and definition to your designs.
To supply your spot UV file, include both the print and spot UV elements in a single PDF file. For single-sided designs, create a 2-page PDF: the first page should contain the print design, and the second page should include the spot UV elements. For double-sided designs, use a 4-page PDF: pages 1 and 2 for the print design, and pages 3 and 4 for the spot UV elements. If spot UV is only needed on one side, include a blank page where spot UV is not required.
Matt: A sleek, professional look with a subtle, non-reflective surface
Soft Touch: A luxurious, velvety texture that creates a premium tactile feel
Scodix spot UV business cards are recyclable if they are not laminated. However, once laminated, they are no longer suitable for recycling. For accurate disposal information, it's advisable to consult your local guidelines on special finish business cards.
The turnaround time for spot uv business card printing depends on your chosen product specification and finishing options. For faster delivery, we offer express production upgrades at an additional cost. To ensure your order is delivered on time, it is important we receive your artwork by the cut-off time indicated on both the product page and basket.
Please note: If your file is submitted after the cut-off time or if corrected artwork isn't provided before the next cut-off time following rejection, it will delay delivery by one working day.
We offer free standard delivery, with optional upgrades available for expedited service, including pre-10:30 AM and pre-12:00 PM for an additional cost.
Yes, we offer international delivery. Contact our Bespoke team for a shipping quote.
Yes, we can arrange split deliveries. Contact our Bespoke team to let us know how you'd like your order sent.
Uploading business card artwork is a breeze. After placing your order, click the upload button on the confirmation page. You can also upload your artwork through the Orders tab of "My Account".
Most orders are sent in boxes. For larger quantities, we may secure your order on a pallet (kerbside delivery). If your location doesn’t have tail-lift access, please contact us after placing your order so we can help arrange the best delivery option. Be sure to have your order number to hand.